


Dutch Yellow® Potato & Leek Soup Melissa's Chef Tom Fraker 3 Tbsp Unsalted Butter3 Tbsp...
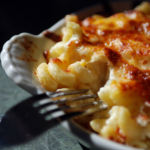
Hatch Chile Relleno Casserole
HATCH CHILE RELLENO CASSEROLE
by Nanny Bubby
Total Time:
40 minutesServes:
6Ingredients
- 8-10 Hatch Chiles roasted, peeled, and seeded
- 2 cups Monterey Jack or Oaxaca cheese shredded (or a mix with cheddar)
- 4 large eggs
- 1 1/2 cups milk (or half-and-half for richer texture)
- 3 Tbsp. flour (or masa harina for a Southwestern twist)
- 1 tsp. baking powder
- 1/2 tsp. cumin
- to taste salt and pepper
- 1 lb. ground beef or Chorizo (optional) cooked and seasoned, for a meatier casserole
- Optional toppings: enchilada sauce, salsa, sour cream, avocado
Directions
- Preheat oven to 375°
- Prep the chiles Roast, peel, and seed your Hatch chiles. Lay them flat on paper towels to dry a bit.
- Layer the casseroleGrease a 9x13baking dish.Spread half the chiles in a layer on the bottom.Sprinkle with half the cheese (and half the meat if using).Add the rest of the chiles, then the rest of the cheese (and meat).
- Make the egg mixtureIn a bowl, whisk eggs, milk, flour, baking powder, cumin, salt, and pepper.Pour evenly over the chile/cheese layers.
- BakeBake uncovered at 375°F for 35–40 minutes, until puffed, set, and golden.
- ServeLet cool for 10 minutes before slicing. Top with warm enchilada sauce or salsa, plus sour cream or avocado slices.
- Enjoy!


Recent Comments