Pasta Salad

Pasta Salad

by Nanny Bubby

I love a great pasta salad. I love it at an outdoor barbeque or at a Sunday sports party. It is so inviting. To me it feels like love in a bowl. Everyone enjoys it – kids and adults alike. Hope you think so too. Enjoy!

Total Time:

1 hour

Serves:

7

Ingredients

  • 1 lb. rotini curly pasta
  • 1 English cucumber cut lengthwise and seeded, then chopped into ½-inch pieces
  • 1 heirloom or beefsteak tomato seeded and chopped
  • 4 scallions minced white and green parts
  • 1 bell pepper red, yellow, or orange, chopped in ½-inch pieces
  • ¼ c. basil minced (reserve 1 Tbsp. for garnishing the top before serving)
  • 1 Tbsp. dried oregano
  • 2 Tbsp. smoked paprika
  • 2 tsp. red pepper flakes
  • 2 tsp. celery seed
  • ¼ tsp. cayenne pepper
  • 2 tsps. black pepper
  • 1 Tbsp. kosher salt
  • 1 Tbsp. sesame seed
  • 1/3 c. grated parmesan cheese
  • For the Salad Dressing:
  • ½ c. EVOO
  • ¼ c. apple cider vinegar
  • 2 Tbsp. fresh squeezed lemon juice
  • 1 Tbsp. Dijon mustard
  • Salt
  • Pepper
  • ¼ tsp. Herbs de Provence

Directions

  • Prepare the Rotini pasta per directions on package but cook one minute less than package directions.
  • Chop all of the necessary vegetables and then combine pasta and all ingredients in one large bowl.
  • Mix the salad dressing and poor liberally onto the salad mixture and toss. This can be done an hour before serving and placed back into the refrigerator.

Notes

Tip: If you do place it back in the fridge before serving, when you take it out reserve a good ¼ C. of dressing to re-toss the salad with as the pasta will absorb the dressing while resting a bit too much and it will taste slightly dry. Once you add the other dressing it springs right back.

More Recipes

No Results Found

The page you requested could not be found. Try refining your search, or use the navigation above to locate the post.

No Results Found

The page you requested could not be found. Try refining your search, or use the navigation above to locate the post.

Savory Palmiers

Savory Palmiers

Savory Palmiers Recipe Adapted From Barefoot Contessa 1 package frozen Pepperidge Farm puff pastry...

Thanksgiving Cheese Ball

Thanksgiving Cheese Ball

by Nanny Bubby

I love the Autumn. In Las Vegas the best months of the year are September, October and November. It is cool and beautiful and everyone comes outside, finally, after a long hot summer. I use this recipe for Halloween, Thanksgiving, and Jewish Holiday called Sukkot, which usually falls in October. Any excuse to celebrate the Autumn, harvest moons and cooler nights – I am ready! Enjoy! With this, we always, "Spread Love Like Butter".

Total Time:

30 minutes

Serves:

9

Ingredients

  • 3 c. orange cheese puffs
  • 2 lbs. cream cheese at room temperature (softened)
  • 3 c. shredded cheddar cheese
  • ¼ c. freshly grated parmesan cheese
  • ¼ c. chives chopped
  • Kosher salt and freshly ground black pepper
  • 1 bell pepper with a long stem that looks like a pumpkin
  • crackers for serving

Directions

  • Put the cheese puffs in a food processor and process until finely ground. Transfer to a shallow plate.
  • Combine the softened cream cheese, cheddar cheese, chives, parmesan cheese, 1 teaspoon salt and 1/4 teaspoon pepper in a large bowl and mix to combine.
  • Mold the mixture into a ball, pressing the top of the ball with your hand to flatten it.
  • With the flat side of your thumb, carve lines down the sides of the ball to resemble a pumpkin.
  • Roll the cheese ball in the ground cheese puffs.
  • Remove the entire bell pepper stem with a paring knife and put it on top of the cheeseball as the pumpkin stem. Seed and slice the bell pepper.
  • Serve the cheeseball on a plate with crackers and slices of bell pepper. Enjoy!

More Recipes

Homemade Pumpkin Puree

Homemade Pumpkin Puree

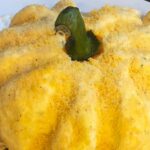
Homemade Pumpkin Purée When your first introduction to any food is from a can you immediately...

No Results Found

The page you requested could not be found. Try refining your search, or use the navigation above to locate the post.

No Results Found

The page you requested could not be found. Try refining your search, or use the navigation above to locate the post.

Stuffed Paccheri

Vertical Stuffed Paccheri

by Nanny Bubby

I was invited to a fundraiser and the caterer served what looked to me like vertical rigatoni. It just looked so fun and happy. I decided to try my hand at making it. I boiled the rigatoni and once I stuffed them, they fell apart while cooking. So, then I tried stuffing them while still dried and the part that stuck out of the sauce was hard and burned. Alas, the rigatoni was just too small and I had to solve the problem of how to make this work. I happened upon Paccheri noodles at the Italian deli. (never heard of them before). I began to solve the problem of, “to boil or not to boil”. And after 20 tries I came up with soaking them in cold, salted water just long enough to where they could compress between your two fingers. The perfect texture to bake and the perfect size to stuff.

Total Time:

3 hours

Serves:

9

Ingredients

  • 1 lb. Paccheri Pasta shells De Cecco brand preferred
  • 30 oz. whole-milk ricotta cheese
  • 1/2 c. grated Romano cheese
  • 2 Tbsp. fresh parsley minced
  • 12 leaves fresh basil cut into chiffonade
  • 1 large egg room temperature lightly beaten
  • Freshly ground black pepper
  • 8 oz. Parmesan grated
  • 2 to 3, 24 oz. jars good-quality Arrabbiata Sauce (Rao’s brand
  • preferred)
  • 8 oz. mozzarella cheese grated
  • Kosher salt to taste

Directions

  • Soak the bag of pasta for 2 to 2.5 hours in cold salted water being sure that all pasta is completely covered. When the pasta is spongy and able to be compressed between two fingers it is ready to be stuffed.
  • Pre-heat oven to 350 degrees.
  • Combine the ricotta cheese, Romano, parmesan, parsley, basil, salt, pepper and egg till mixed evenly. Fill a pastry bag with a large star tip with the mixture.
  • Fill a non-metallic skillet with enough pasta sauce so that it comes about 2/3 up the side of the pan. Place the softened Paccheri into the pan vertically.
  • Fill the Paccheri tubes with the ricotta mixture all the way to the very top.
  • Place into the oven for 25 minutes with the pot covered so that the pasta will continue to cook and steam to the perfect texture.
  • The last 10 minutes sprinkle with Mozzarella cheese and cook with the top off until melted. Enjoy!

Video

More Recipes

No Results Found

The page you requested could not be found. Try refining your search, or use the navigation above to locate the post.

No Results Found

The page you requested could not be found. Try refining your search, or use the navigation above to locate the post.

Savory Palmiers

Savory Palmiers

Savory Palmiers Recipe Adapted From Barefoot Contessa 1 package frozen Pepperidge Farm puff pastry...

Simply Delicious Brisket

Simply Delicious Brisket

by Nanny Bubby

At a Jewish Food Festival I came across the most delicious flavor of brisket. It was unlike anything I had ever tasted and was so savory. I could not place the flavor. In my mind I ran through all the obvious items you cook brisket in but couldn’t place that one taste. Come to find out, it was cayenne pepper. I created this rub to add to my traditional, simple brisket recipe and the feedback I get on this brisket is unlike anything I ever have gotten for brisket. Try it. Enjoy!

Total Time:

4 hours

Serves:

8

Ingredients

  • 1 beef brisket 6 lbs.
  • 2 large onions chopped
  • 6 cloves garlic unpeeled
  • 3 bay leaves
  • 4 c. organic beef stock
  • 2 Tbsp. Kosher salt
  • 1/2 Tbsp. black pepper
  • 1 ½ Tbsp. cayenne pepper

Directions

  • Preheat the oven to 500 degrees.
  • At time of purchase, ask the butcher to trim the fat from the brisket leaving about a ¼ of an inch of fat.
  • Create the rub by mixing together the salt, pepper and cayenne in a shallow bowl.
  • Pat the meat dry and let sit out for about 15 minutes while you peel and chop the onions and prepare the garlic and bay leaves.
  • Cover the meat generously with the rub, making sure to get into all of the crevices.
  • Place the meat point side down in a large roasting pan and cook 30 minutes in the oven on one side and then turn to the other side and cook for another 30 minutes until browned and crisp on both sides.
  • Add the chopped onions to the pan, scattering them around the brisket. Stir to coat the onions with the drippings and scrape up any brown bits.
  • Return the brisket to the oven and roast until the onions are soft, about 10 minutes, being careful not to burn the ends of the onions.
  • Remove the pan from the oven and reduce the heat to 350 degrees. Add the garlic and the bay leaves to the pan. At this point the brisket should be point side up.
  • Pour in enough stock to reach about one inch up the sides of the brisket and scrape down the brown bits. Cover the pan tightly with a lid or heavy duty foil and return to the oven. Braise until very, very tender, about three hours.
  • Check the meat every 30 minutes during the cooking time and add stock as needed to keep the simmering juice about one inch high and the onions from burning. You could need more than four cups stock. If you do, you can either add more stock or just water. It is a personal preference.
  • Remove the pan from the oven and transfer the brisket to a pan for the refrigerator.
  • Pour the juices and onions into a glass container like a large eight-cup glass measuring container and let cool.
  • Add a little water to the pan and place over medium heat stirring and scraping the brown bits from the bottom. Add these drippings to the glass container. Let the meat and juices cool overnight in the refrigerator.
  • Tip: Before re-heating, lift the congealed fat from the juices in the jar and discard. If there is any fat in or around the brisket, also remove that fat.
  • Spread about ¼ of the remaining juices on the bottom of the pan. Slice the brisket on the diagonal while cold and place each slice into the pan on top of the cold juices.
  • Cover and reheat the brisket for 30 minutes at 325 degrees. Reheat the remaining juices in a saucepan and place in a gravy boat to be served with the brisket.

More Recipes

No Results Found

The page you requested could not be found. Try refining your search, or use the navigation above to locate the post.

No Results Found

The page you requested could not be found. Try refining your search, or use the navigation above to locate the post.

No Results Found

The page you requested could not be found. Try refining your search, or use the navigation above to locate the post.

Ricotta Meatballs – Gluten Free

Ricotta Meatballs (Gluten Free)

by Nanny Bubby

During the COVID shut down in April 2020, it was my sister’s birthday. My dad, who has been in the restaurant business most of his life, has had a marvelous woman, Pat Rost, working for him for the last 45 years. She is Italian and makes the best food. The four of us got together to celebrate my sister’s birthday and Pat cooked. We were all excited because she makes fantastic meatballs. But she surprised us and said she had made a different kind of meatball. We were disappointed when we heard this until we bit into it! It was the most delicious meatball I have ever tasted. Thankfully, she shared the recipe with me. Here it is, Enjoy!

Total Time:

1 hour 30 minutes

Serves:

11

Ingredients

  • 2 lbs. ground beef 85%-15% meat to fat ratio
  • 30 oz. whole-milk ricotta cheese rested in sieve in fridge for 2 hours to release some of the juices
  • 2 Tbsp. fresh parsley minced
  • 2 Tbsp. fresh mint minced
  • 12 leaves fresh basil cut into chiffonade
  • ¼ c. grated parmesan
  • 3 large eggs room temperature lightly beaten
  • 2 Tbsp. Kosher salt
  • 1 24 oz. jar marinara sauce Rao’s brand preferred

Directions

  • Preheat oven to 350 degrees.
  • Combine ground beef, garlic, parsley, mint, eggs, ricotta, parmesan and ricotta cheese and lightly mix with fork.
  • Let mixture sit in the fridge for one hour.
  • Use an ice cream scoop to make perfect shaped and consistent sized meatballs. This will help to ensure all meatballs cook evenly.
  • Place meatballs on a sheet pan and place into the oven for 20 to 25 minutes.
  • Once cooked immerse in warm marinara sauce for about 7 minutes and serve. Enjoy!

Video

More Recipes

No Results Found

The page you requested could not be found. Try refining your search, or use the navigation above to locate the post.

No Results Found

The page you requested could not be found. Try refining your search, or use the navigation above to locate the post.

Savory Palmiers

Savory Palmiers

Savory Palmiers Recipe Adapted From Barefoot Contessa 1 package frozen Pepperidge Farm puff pastry...