
No Results Found
The page you requested could not be found. Try refining your search, or use the navigation above to locate the post.

by Nanny Bubby
Total Time:
1 hour 30 minutesServes:
11The page you requested could not be found. Try refining your search, or use the navigation above to locate the post.
The page you requested could not be found. Try refining your search, or use the navigation above to locate the post.

Sriracha or Chipotle Microwave Popcorn For Sriracha Popcorn1 bag organic microwave popcorn½ stick...
by Nanny Bubby
Total Time:
35 minutesServes:
7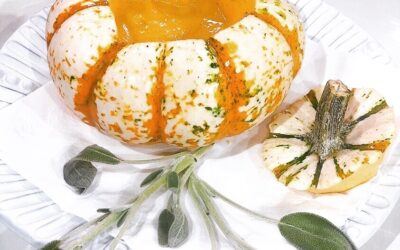
Baked Miniature Pumpkins as a Soup Bowl Enough Tiger Pumpkins for each one of your guests. Carve...
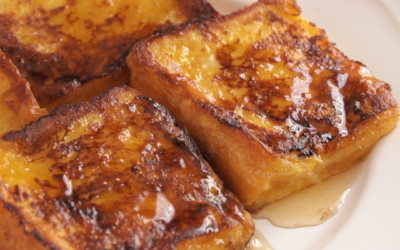
French Toast 1 slice Challah or Brioche bread1 egg1 tsp. orange zest¼ tsp. vanilla2 Tbs. Almond...
Sriracha or Chipotle Microwave Popcorn For Sriracha Popcorn1 bag organic microwave popcorn½ stick...
by Nanny Bubby
Total Time:
7 minutesServes:
1
Crispy Parmesan Dutch Yellow Potatoes I love Autumn, and one of my favorite parts of this time of...
French Toast 1 slice Challah or Brioche bread1 egg1 tsp. orange zest¼ tsp. vanilla2 Tbs. Almond...

Sea Bass Puttanesca from Food Network Salt6 anchovy fillets in oil1/2 c. white wineOne 24-oz jar...
by Nanny Bubby
Total Time:
Serves:
Crispy Parmesan Dutch Yellow Potatoes I love Autumn, and one of my favorite parts of this time of...
The page you requested could not be found. Try refining your search, or use the navigation above to locate the post.
The page you requested could not be found. Try refining your search, or use the navigation above to locate the post.
by Nanny Bubby
Total Time:
15 minutesServes:
4The page you requested could not be found. Try refining your search, or use the navigation above to locate the post.
The page you requested could not be found. Try refining your search, or use the navigation above to locate the post.
The page you requested could not be found. Try refining your search, or use the navigation above to locate the post.


Recent Comments