Holiday Goat Cheese Pockets For Salad

Holiday Goat Cheese Pockets For Salad

by Nanny Bubby

I love to cook the unusual, the unexpected and something totally delicious, especially during the holidays. These goat cheese pockets always put an amazing smile on peoples faces when I begin to serve them. They are so unexpected, and no one actually knows what they are until you tell them and then I hear an, “Oooooh” from the guests at the table.
I love serving this over a green bean, arugula salad with orange sections from the tangelos I grow on my own tree in my “Victory” garden to highlight the orange zest in this recipe that adds so much to every bite of the goat cheese. Remember….. “Spread Love Like Butter” !

Total Time:

45 minutes

Serves:

4

Ingredients

  • 12 ozs. good goat cheese
  • ¾ c. dried cranberries
  • 2 Tbsp. orange zest about 2 large oranges
  • 8 sheets frozen phyllo dough defrosted
  • 6 Tbsp. unsalted butter melted
  • 4 Tbsp. plain dry bread crumbs
  • Kosher salt and freshly ground black pepper

Directions

  • Preheat the oven to 375 degrees.
  • Remove the goat cheese wrapper and place the goat cheese into the freezer for 15-20 minutes prior to slicing.
  • Cut four equal slices of goat cheese from your log of the goat cheese. (HINT: place goat cheese in freezer for 20-30 minutes and it will cut without crumbling.)
  • Cover the stack of defrosted Phyllo dough with a slightly damp towel to keep it moist and keep it from drying so it is not difficult to work with.
  • Place one sheet of phyllo on a cutting board, brush it with butter, and sprinkle it with 3/4 teaspoon of bread crumbs.
  • Repeat with a second sheet of phyllo on top, brush it with butter, and sprinkle it with bread crumbs, continuing until you have 4 sheets of the phyllo stacked up.
  • Cut the phyllo in half crosswise to make two equal rectangles.
  • Place a slice of goat cheese in the middle of one stack of phyllo, sprinkle 5-8 cranberries on top, followed by a sprinkle of the orange zest.
  • Fold a corner diagonally over the cheese, and pleat the rest of the dough up and around the cheese, enclosing it completely.
  • Place the package, folded side up, on a sheet pan lined with parchment paper.
  • Depending on the size of your phyllo dough, you may need to trim the tops of the package so it is flat on top when folded over.
  • Repeat the process, until you have 4 packages filled with goat cheese.
  • Brush the packages all over with melted butter, cover and refrigerate until ready to bake.
  • When you are ready, bake 15-20 minutes until golden brown. Serve warm over your favorite salad. Mine is a cold green bean, arugula salad with a Dijon vinaigrette.
  • Enjoy! Remember, "Spread Love Like Butter"

More Recipes

No Results Found

The page you requested could not be found. Try refining your search, or use the navigation above to locate the post.

No Results Found

The page you requested could not be found. Try refining your search, or use the navigation above to locate the post.

No Results Found

The page you requested could not be found. Try refining your search, or use the navigation above to locate the post.

Upside-Down Cranberry Apple Cornbread Cake

Upside-Down Cranberry Apple Cornbread Cake

by Nanny Bubby

I love when the Autumn foods meet the winter foods, and you can make a comforting dessert that is not too sweet. That is what this recipe represents to me. Usually, cornbread is reserved for Thanksgiving, and apples and cranberries more for the December holidays. This recipe combines both and entices your senses and palate to begin to welcome those amazing fun December celebrations coming ahead. Enjoy! and always, “Spread Love Like Butter”.

Total Time:

1 hour

Serves:

8

Ingredients

  • 2 sticks butter
  • 1/2 c. brown sugar
  • 1 tsp. cinnamon
  • 1 tsp. finely ground kosher salt
  • 2 Granny Smith apples peeled, cored and sliced in thin wedges
  • 1 8-12 oz. package fresh cranberries rinsed and stems removed
  • 1 c. finely ground yellow cornmeal
  • ¾ c. all-purpose flour
  • 1 tsp. baking powder
  • ¾ c. granulated sugar
  • 3 large eggs room temperature
  • ½ c. whole milk room temperature

To moisten and finish the cake:

  • 1/3 c. pure maple syrup or honey

Directions

  • Preheat oven to 350°
  • Melt ½ stick butter in a 10-inch cast-iron skillet over medium heat. Stir in the brown sugar along with the cinnamon and salt. Cook stirring constantly until the sugar is melted and begins to bubble about 10 minutes. Remove from the heat and let cool slightly.
  • Arrange the apples in concentric circles on top of the brown sugar mixture in the pan. Pour the bag of fresh cranberries and smooth evenly over the top of the apples. Set aside.
  • Whisk together the cornmeal, flour, baking powder and remaining 1/2 teaspoon salt in a small bowl.
  • In a stand mixer fitted with the paddle attachment beat the remaining 1 ½ sticks of butter together with the granulated sugar on high speed until light and fluffy. Add the eggs, one at a time, beating after each addition. On low speed, add half the dry ingredients and half the milk, then alternate adding the dry and then the milk one last time. Increase the speed to medium and beat just until everything is well mixed, scraping down the bowl once. (Use a spatula to be sure there are no dry ingredients stuck to the bottom of the bowl.)
  • Pour the batter evenly over the apples and cranberries in the skillet, then use a spatula to gently smooth it out, being careful not to disturb the apples.
  • Bake until the top is golden brown and puffed and a tester inserted in the center comes out clean, 35 to 40 minutes.
  • With a toothpick or fork, pierce the cake all over. Generously drizzle the maple syrup or honey over the top and allow to seep into the cake to moisten it.
  • Let cool for 20 minutes. While the cake is still warm, run a butter knife around the outside, then invert onto a serving platter. Serve warm. Enjoy! And, “Spread Love Like Butter”

Video

More Recipes

No Results Found

The page you requested could not be found. Try refining your search, or use the navigation above to locate the post.

Thanksgiving Butter Board

Thanksgiving Butter Board

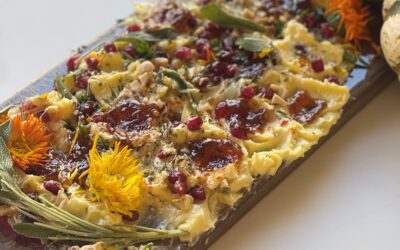
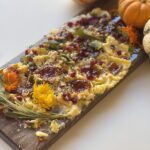
Thanksgiving Butter Board I love Thanksgiving! It is my favorite holiday. I love the traditions of...

No Results Found

The page you requested could not be found. Try refining your search, or use the navigation above to locate the post.

Thanksgiving Butter Board

Thanksgiving Butter Board

by Nanny Bubby

I love Thanksgiving! It is my favorite holiday. I love the traditions of what we cook just once a year. But, appetizers are always the wild card. They change yearly based on what is in style for the year. This butter board is so much fun and so delicious. Enjoy!! Remember, "Spread Love Like Butter"

Total Time:

20 minutes

Serves:

8

Ingredients

  • 1 lb. butter
  • 3 Tbsp. honey
  • 4-6 dollops of fig preserves or jam
  • A handful of chopped Marcona Almonds
  • 1/4 c. pomegranate seeds
  • A large sprinkle of sea salt flakes
  • 6-8 sage leaves
  • 1-2 Tbsp. diced small rosemary and thyme leaves
  • Edible flowers chopped

On the side for the scooping:

  • Sliced pears
  • Sliced radishes preferably watermelon radishes
  • Sea salt crackers
  • Fresh whole wheat bread sliced thick and toasted

Directions

  • Bring the butter to room temperature. Using an offset spatula, spread the butter evenly and thickly over the board. Using the nose of the spatula make divots in a row and then divot in between each divot on the next row alternating all the way down the board you are using.
  • Next add the fig Jam into the divots in about every 5 butter divots unevenly throughout the board. Drizzle on the honey. Sprinkle the almonds and pomegranate seeds evenly over the butter. Next sprinkle generously with sea salt
  • In the Autumn I use sage leaves, but in the summer, you could use basil or mint. Sprinkle the diced rosemary and thyme. Finish with edible flowers.
  • Place all your dipping crackers and fruit and veggies on the side for your enjoyment!
  • Enjoy!

Video

More Recipes

No Results Found

The page you requested could not be found. Try refining your search, or use the navigation above to locate the post.

No Results Found

The page you requested could not be found. Try refining your search, or use the navigation above to locate the post.

Taco Mac N’ Cheese

Taco Mac N’ Cheese

by Nanny Bubby

I love comfort food during the fall. It is great for when the trick or treaters come home. They are cold and ready for a great warming meal. This is a one skillet meal, so it is a simpler recipe for the cook at home to pull together while multi-tasking between homework, or trick or treaters at the door, or football and whatever else comes about during a cool autumn night. Enjoy!

Total Time:

35 minutes

Serves:

7

Ingredients

  • 1 Tbsp. olive oil
  • 1 diced sweet onion
  • 3 Tbsp. tomato paste
  • 3 cl. garlic minced.
  • 1 lbs. 8/20 ground meat.
  • 1 Tbsp. Nanny Bubby’s Taco Seasoning*
  • 1 c. beef stock
  • 8 oz. elbow macaroni cooked
  • 6 oz. shredded sharp Cheddar cheese.
  • Kosher salt and pepper to taste.
  • Sour cream green onions, and avocado for garnish.

Directions

  • In a large, heated cast iron skillet add the olive oil. As soon as it shimmers, add the onion and brown. This should take about 5-7 minutes.
  • Add the tomato paste and cook until it caramelizes and brown bits begin to form at the bottom of the pan.
  • Add the garlic and sauté with the onion and paste for about 30 seconds. If the garlic begins to burn add a tablespoon of the beef broth to slow down the cooking.
  • Add the meat to the skillet. Stirring frequently while breaking up the ground meat with a wooden spoon or spatula, brown the meat about 7-9 minutes.
  • Add Nanny Bubby’s Taco Seasoning* to the meat and combine evenly coating the meat well.
  • Add the beef stock and bring to a boil and then let simmer for about 5-10 minutes until the sauce thickens.
  • Combine the elbow macaroni into the sauce and combine well.
  • Sprinkle the top heavily with the cheddar cheese and garnish with sour cream, green onions, and avocado.
  • Serve right out of the skillet along with traditional taco shells, jicama taco shells, or Cheese Keto taco shells.
  • Enjoy!

Video

Notes

More Recipes

No Results Found

The page you requested could not be found. Try refining your search, or use the navigation above to locate the post.

No Results Found

The page you requested could not be found. Try refining your search, or use the navigation above to locate the post.

No Results Found

The page you requested could not be found. Try refining your search, or use the navigation above to locate the post.

Braised Hatch Chile Chicken Thighs

Braised Hatch Chile Chicken Thighs

by Nanny Bubby

We LOVE chicken thighs, and we LOVE Hatch Chiles which are only available fresh one time a year, mid-August to mid-September. These are so tender, flavorful and delicious when browned and then braised. You will make them over and over and over again. Remember, when Hatch chiles are not in season just add a 4 oz. jar of the Hatch chilis and you will be A-OK! Enjoy!
For links to SHOP and all ingredients at Melissas.com CLICK HERE

Total Time:

1 hour

Serves:

4

Ingredients

  • Ingredients:
  • 6-8 Bone-in skin on chicken thighs
  • 1 sweet onion halved and sliced
  • 2 Hatch chiles roasted skinned and diced small or a 4 oz. can of Hatch chiles
  • 4 cl. minced garlic
  • 2 tsp. kosher salt
  • 1 tsp. ground pepper
  • 1 ½ tsp. smoked ground paprika
  • 1 c. chicken stock
  • 1 Tbsp. olive oil
  • 2 Tbsp. basil or parsley minced for garnish

Directions

  • Heat oil in a large Dutch oven or heavy-bottomed pot. Season chicken with salt, pepper and paprika. Add to pot, skin side down and cook, without disturbing, until skin has rendered most of the fat and is a nice golden brown, 12 to 15 minutes on medium high heat. (You want it to be very deeply browned so that it stays brown as it braises.)
  • Flip the chicken and continue to cook until browned on the other side, another 5 or so minutes.
  • Transfer chicken to a plate or cutting board, leaving all the fat and golden bits behind. Add minced garlic, the sliced onion and the diced hatch chiles. Season with salt and pepper and cook, stirring occasionally, until garlic, onion and Hatch chiles are softened and translucent, 5 to 7 minutes.
  • Add the chicken stock and bring to a simmer. Add back in the chicken thighs and simmer uncovered until the sauce has thickened about 20-25 minutes. Garnish with the basil or parsley or both and serve.
  • That’s it! Enjoy!

Video

More Recipes

No Results Found

The page you requested could not be found. Try refining your search, or use the navigation above to locate the post.

No Results Found

The page you requested could not be found. Try refining your search, or use the navigation above to locate the post.

No Results Found

The page you requested could not be found. Try refining your search, or use the navigation above to locate the post.